
Set up Rapid Bridge
Rapid Bridge is a small program you run on your own server, next to your backend. It signs and encrypts every balance and statement request before it goes to the bank, and it verifies and decrypts every response. Your backend sends and receives plain JSON and never deals with cryptography.
You set it up once per environment (sandbox, bank UAT, production).
How it fits
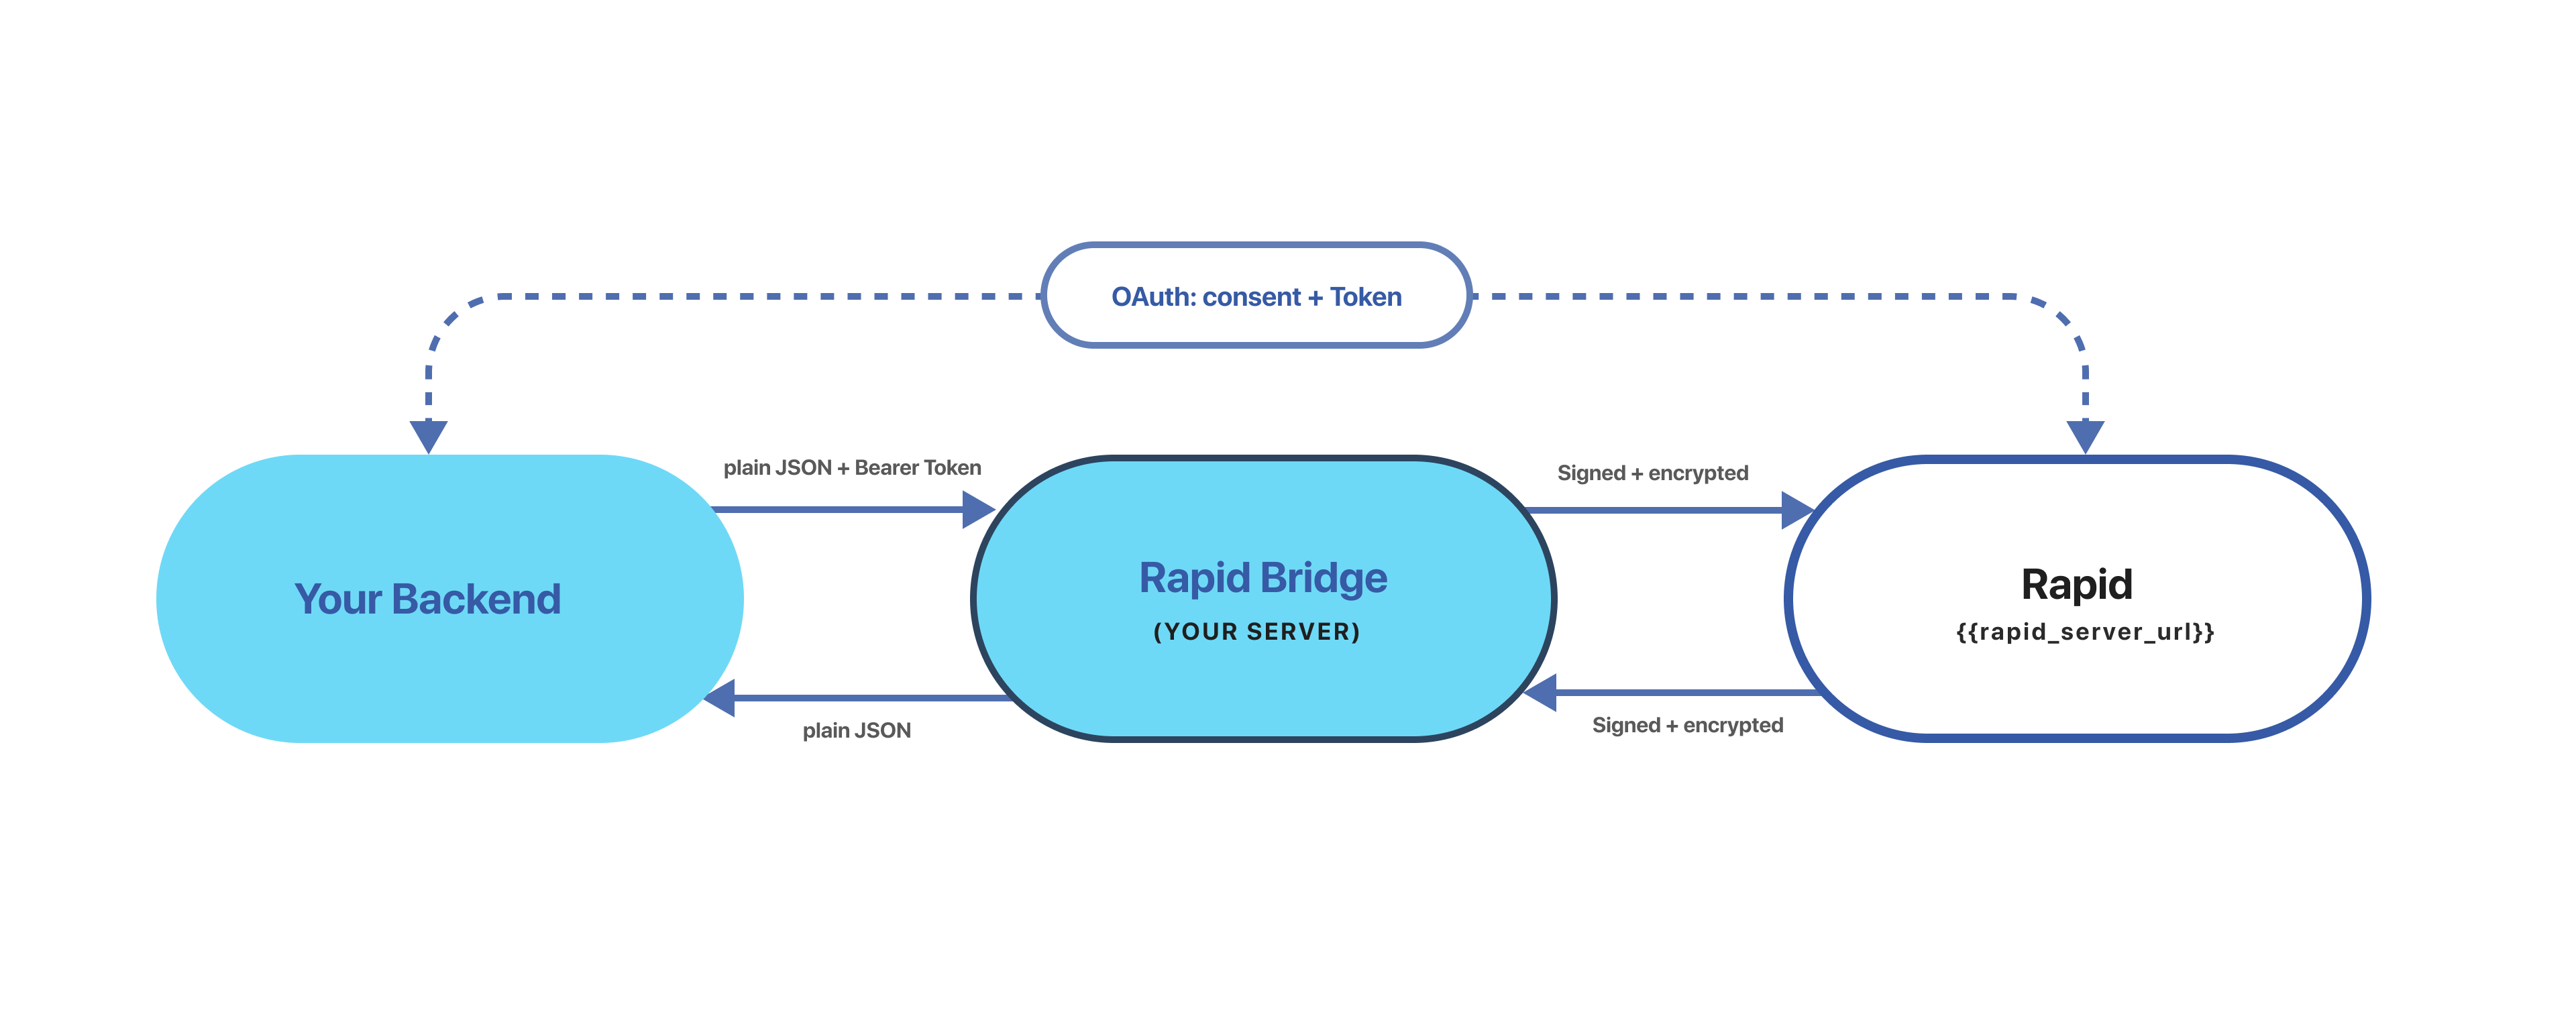
- OAuth calls go directly from your backend to Rapid. They don’t pass through the Bridge.
- Balance and statement calls go from your backend to the Bridge. The Bridge forwards all headers,
Authorizationincluded. - Only your backend needs to reach the Bridge. Don’t expose it to the internet.
rapidUrl and rapidAPIUrl values, and a Rapid User Portal login. You get these when you register your application. The Rapid team will guide you through registration.- 1
Install
Use release v1.3.0. Create an empty folder (this page calls it
rapid-bridge/) and put the executable in it.Download the file for your OS from the v1.3.0 release and rename it to
rapid-bridge(rapid-bridge.exeon Windows).OS Release file macOS (Apple Silicon) app-mac-arm64macOS (Intel) app-intel-macLinux app-linuxWindows app-windows.exeIf macOS blocks it as coming from an “unidentified developer”, run:xattr -d com.apple.quarantine ./rapid-bridgeRun every command from inside therapid-bridge/folder. On Windows, use.\rapid-bridge.exewherever this page says./rapid-bridge. - 2
Configure
Create two files next to the executable.
.env:SERVER_PORTis the only setting. Keep the leading colon._rapid_bridge_data/core.json: leave the value empty. - 3
Register your application
When prompted, choose Generate a new key pair. The Bridge creates an RSA (4096-bit) and an Ed25519 key pair in a new key-version folder:
_rapid_bridge_data/
└── application/
    └── <application-slug>/
        ├── <application-slug>.json      ← "slug" and "key_version"
        └── <key-version>/
            ├── rsa_public_key.pemupload in step 5
            ├── rsa_private_key.pemnever share
            ├── ed25519_public_key.pemupload in step 5
            └── ed25519_private_key.pemnever share
The application slug you use here is the value you send as
X-Source-Slug.Your key version
The key version is the name of the
<key-version>folder, for example01M2M98ENKC02Z2N58E2W51WMW. It is also stored askey_versionin<application-slug>.json. Send it as theX-Key-Versionheader.Back up_rapid_bridge_data/securely. If you lose the private keys, you have to generate new ones and upload them again. - 4
Connect a bank
Run this as one line:
Sandbox example:
When prompted, choose fetch to download the bank’s public keys. They are saved to
_rapid_bridge_data/bank/<bank-slug>/.The bank slug you use here is the value you send as
X-Destination-Slug.Flag What it is Watch out for --rapidUrlWhere the Bridge fetches the bank’s public keys Must end in /api/v1--rapidAPIUrlWhere the Bridge sends balance and statement calls Don’t add /api/v1. The Bridge appends/api/v1/resource/...itself - 5
Upload your public keys
Rapid needs both of your public keys before it accepts your requests.
- Log in to the Rapid User Portal.
- Click your business row, then open the Applications tab.
- Click the upload icon on your application’s row. Or open the application, go to the Keys tab and click Upload Keys.
- Upload both public keys from
_rapid_bridge_data/application/<application-slug>/<key-version>/:rsa_public_key.pemed25519_public_key.pem
No approval is needed. Never upload the
*_private_key.pemfiles. - 6
Run the Bridge
This starts the Bridge on
SERVER_PORTand keeps it running in the foreground until you stop it with Ctrl+C. Your{{rapid_bridge_url}}is nowhttp://localhost:8080(or the port you set).Check that it works: open
http://localhost:8080/swagger/index.htmlin a browser.In production, run it under the process manager you already use (systemd, Docker, a Windows service), always from the folder that contains
.envand_rapid_bridge_data/.Next: get an access token →
Troubleshooting
If a call fails, check these in order:
- Is the Bridge running?
http://localhost:8080/swagger/index.htmlshould load. - Is it running from the right folder?
.envand_rapid_bridge_data/must be in the current directory. - Do the headers match the folders?
X-Source-Slug= folder name under_rapid_bridge_data/application/X-Destination-Slug= folder name under_rapid_bridge_data/bank/X-Key-Version= name of the key-version folder
- Are the keys uploaded? Both public keys from that exact key-version folder. If you re-ran
init app, you have a new key version, so upload again and update the header. - Is the token fresh? Access tokens expire in under a minute.
- Is the body valid? It must be
{"message": "<xml>"}, with every"inside the XML escaped as\". - Check the Bridge’s terminal output. It logs every request and the URL it forwarded it to.
Going live with a bank
The sandbox is for building and testing. For each bank environment (UAT, then production):
- Register your application for that environment. You get a new set of values: URLs, bank slug, application slug and client credentials, and you register your
redirect_uriagain. - Run step 3 with the new application slug and step 4 with the bank’s slug and URLs.
- Upload your public keys in that bank’s Rapid User Portal.
- Point your OAuth calls at the bank’s
rapid_server_url, and send the new slugs and key version in your headers.
Your code stays the same. Only the configuration changes. Keep each environment’s values separate.
How the Bridge secures messages
Show details
You don’t need to implement any of this. The Bridge does it for you.
For each request, the Bridge:
- Encrypts the payload with AES-256-GCM, using a random 32-byte key and a 12-byte nonce.
- Encrypts that AES key with the recipient’s RSA public key.
- Signs the encrypted payload, the encrypted key and the nonce with your Ed25519 private key.
Responses follow the same steps in reverse. The Bridge verifies the signature and decrypts the response before it hands it to your backend.